Chocolate mini pots

A few weeks ago I had this dessert challenge. I wanted to come up with a dessert that was fast, chocolaty, delicate, not too sweet, very rich, easy, small portions with nothing left over.

I had a recollection of something like this – and sure enough there were some inspirational ideas in America’s Test Kitchen.

But they weren’t quite what I wanted. Usually the amounts were too big, or they were too complex. What I had in mind was small ramekin sized chocolate pots to serve 3-4 people who are watching their weight, have just had a great dinner, and want a little dessert finisher at the end.

Here is what I came up with that will yield 4 – 3 ounce ramekins.

null

Mise en scene (not including the flour)

Ingredients

  • 1 tbs all purpose flour
  • 1/4 tsp baking powder
  • (you can happily make the recipe without the flour – it will be more moussy)
  • 125g unsalted butter (about 1/4lb butter)
  • 125g semi sweet chocolate (about 4 oz)
  • 1 large egg
  • 1 cup whipping cream with a teaspoon of sugar and a dash of vanilla. You only use 2 tbs in the dessert itself. The rest is for the topping or whatever else you want it for.
  • 1 tsp liqueur – your choice
  • 1 tbs whole milk
  • 1 tsp vanilla

Instructions

  1. Melt the butter and chocolate together. Any way you can. Microwave is fine
  2. Make whipped cream. The whipping is optional, but it will make a difference, as you are adding in air that will make it lighter and somehow silkier
  3. Mix the flour and baking powder together – if you decide to use them. With them, the result is a little more like a cake and without, more moussy.
  4. Whisk together the egg, milk and vanilla and liqueur
  5. Blend in the melted butter and chocolate until fully intergrated
  6. Blend in 2 tbs of the whipped cream
  7. Fold in the flour/baking powder (if you are using them)
  8. Pour into ramekins.
  9. Cooking can vary. Essentially you need to get them to a temperature where the eggs solidify, and it does not matter how you do it. You can zap it in a microwave for 30 seconds at a time until it looks cooked & a toothpick comes out clean – about 1-1.5 minutes. Or you can stick it in a cooling down oven beginning at 375-400. Leave it and let it cook gently. Or you can push the oven to 375, put in the ramekins, turn off the oven. They should be done in 10 minutes. I imagine that 250 for 30 minutes will also work, though I have not tried that yet.
  10. Cool the ramekins down to room temperature or lower.
  11. Add topping as you see fit: whipped cream, icing of your choice, fruit, candied nuts, jam- whatever grabs you.
  12. Other options: add a tbs of your favorite jam to get a fruit flavour.
  13. Also your liquer can change or if you don’t like, omit it. I’ve tried bourbon, brandy, kirsh so far. The main thing is that it should have a distinct flavor. (So no vodka)

My Breakfast Sandwich

I used to love hitting Tims in the morning for breakfast, and my go to choice was a bagel belt and coffee. This is a breakfast sandwich with egg, cheese, bacon or sausage, lettuce and tomato.

For those of you who are not in Canada, ‘Tims’ stands for Tim Hortons – a fast food chain that was started in the ‘60s by a famous retired hockey player (how Canadian, eh?) and is now the main fast food joint across Canada. What’s good about it is that every Tims has exactly the same menu and it tastes exactly the same no matter where you are in the 8,000km stretch that is Canada. What’s bad about it … is that same consistency. Each store is run like a mini factory, the employees needing to meet quota deadlines on their performance all to get minimum wage. It can be a pretty awful place to work. I still don’t know if Canadian tastes influence Tim’s menu choice, or vice versa. Its a chicken and egg thing.

A while ago I was determined to be able to better the Bagel Belt at home, and it wasn’t that hard to do. If you have read some of my other posts, you know I always have some sourdough on the go, which means a bag of dough ready to be made into a loaf at any time its needed. So without further explanation, here’s one of my go to at home breakfasts.

If you are a baker and have a bag of dough ready to be made into bread, shape about 140g piece of dough into a bun slightly bigger than a ramekin, and throw some sesame seeds – or whatever you like/have. Or, you can use a burger bun, pita, a bagel or an English muffin. Whatever you have on hand.


And cook it dry in a cast iron frying pan at a medium heat, covered. Flip it every minute or so. Its ready when it starts turning brown.


Cut up a few pieces of bacon into a ramekin

And toss them in the microwave, covered for 30 seconds

Make your coffee….

Add a raw egg to the partly cooked bacon and stir….

Add some cheese on top


And throw it back in the microwave for 1 minute….


Prepare your sandwich….


And… Brekky!

Make Great Sourdough Bread

Wouldn’t you love to be able to make a beautiful loaf of sourdough bread, but found the prospect too complex, confusing and time consuming? Wouldn’t it be also great if you could integrate it seamlessly into your already busy life? This blog describes a process for making sourdough bread that, if you follow it more or less correctly, will yield a rich, complex, nutty, flavourful sourdough each and every time.

This blog is the online accompaniment to my sourdough bread workshop I do for my food coop. Before going into the nitty gritty of the microbiological theory of sourdough, I’d like to start with a basic one loaf recipe. Even if you read no further, you will be on your way.

The basic loaf recipe – makes one 850g loaf

Ingredients

For the refresh

  • 100g starter
  • 100g water
  • 60g flour

This will give you 260g of starter for your loaf.

For the rest of the recipe

  • 150g starter (from above). Keep what is left for your next bread baking.
  • 450g flour
  • 240 g water
  • 10g salt

Method

  1. Refresh your starter: combine 100g starter, 100g water and 60g flour in a 500ml jar. mix thoroughly, put a lid on it and leave it for between 6-12 hours at room temperature.
  2. Pour 150g into another jar or a bowl to use in your bread. Leave the remaining 100g in a jar in your fridge.
  3. Prepare your bulk rise: thoroughly mix together 150g starter, 450g flour, 240g water, 10g salt. Mix and knead until it is completely consistent.
  4. Place a damp towel over it in your mixing bowl and either leave it on the counter for 4-6 hours OR keep it in the fridge for between 12-36 hours.
  5. Prepare your proofed loaf: Your loaf will have risen.
  6. Remove it from the bowl and knead using the stretch and fold technique. Take a corner of the dough, pull it but not until it breaks, and fold it back into the middle. Repeat this process until the dough becomes stiffer.
  7. Prepare your banneton: place a dry cloth in the banneton, coating it with flour, or whatever grains and seeds you wish to be on the top of your loaf. This also helps the dough to not stick to the cloth. You can likewise use a loaf pan: instead of a dry cloth, line the pan with parchment paper and roll the dough gently in whatever toppings (if any) you want.
  8. Place your loaf in the banneton and generously sprinkle cornmeal on top as this will be the bottom of your loaf.
  9. Let it rest & rise either at room temperature for 1-2 hours, or in the fridge for up to 12 hours.
  10. Baking: Oven to 440F. Be sure your oven racks and pizza stone (if that is what you are using) are properly positioned so that when your bread rises, it will have some room.
  11. Prepare some parchment paper for the loaf to cook on. If you are using a baking tray, put the parchment paper on the tray. If you are using a pizza stone, put it on the counter and have a pizza peel ready to slide it into the oven. If you are making a pan loaf, line the pan with parchment paper.
  12. When the oven has reached 440F, turn the loaf out onto the parchment paper.
  13. Slash the loaf with a sharp knife. This is critical: a thin cut on the crust allows the bread to expand well in the oven (oven spring). See either Youtube or this Food 52 entry.
  14. If your bread has been at room temperature, bake for about 25 minutes. If it has come from the fridge, try 30 minutes. Each stove is different so you will need to experiment. Ideally your loaf should be at between 180-190F at the point it comes out of the oven. Use a digital thermometer. If you used a bread pan, it may take an hour.
  15. Let the bread rest for about 20-30 minutes before digging into it. It still continues to cook once out of the oven.

With this basic recipe hopefully successfully done, its now time to understand it better. The rest of the blog will help you to do this and provide tools to provide a wide range of options for your baking pleasure.

Understanding Sourdough

A basic sourdough loaf begins with 4 elements: starter, flour, water, and salt. That’s what you can see and measure. What you can’t see is the complex microbial community that also lives, grows and changes in it – until its baked, that is.

The wheat seed is pretty amazing little package containing everything needed to develop healthy growing micro organisms that have the potential to provide both nourishment, and future growth. There’s starches that provide the food, dormant yeasts, bacteria and enzymes too, that all work together to enable both sprouting and in our case, the development of a starter.

Lets begin with the yeasts: They are very simple little one celled organisms and don’t have a lot of needs. Their main need is food and temperature. In the case of sourdough, their food is sugar. Sugar is a pretty simple molecule, made from carbon, hydrogen and oxygen. However,it is not available in any great quantity in the wheat seed. Starches are available, and these are quite complex molecules – imagine a long train of simple sugar molecules. They need to be broken down. Fortunately, there are also enzymes called amylaces. When they are combined with water, they are activated and go to work to break down the starches into simple sugars. Once the starches are converted to simple sugars, the yeasts in the flour can now get to work and consume, reproduce, and off-gas carbon dioxide.

The starter starts off as flour and water, but growing in it are important living lactic acid bacteria – Lactobacillus. This is the same bacteria that lives in your digestive system, fights pathogens and generally keeps you healthy. Its what is in probiotics, yogurt, and all fermented foods. They are in the flour as well, and like the enzymes and yeast, need water to activate them. The lactobacillus also metabolizes sugar to provide that distinct nutty/tangy flavor.

The yeasts and bacteria grow best at different temperatures. Sourdough yeasts can grow and develop in a in a wide range of temperatures from 10C to 35C. Their optimum range is between 25-30C. When they are baked, they die off after about 45C degrees. The variety of lactobacillus bacteria present tend to prefer higher temperatures. Most people prefer room temperature as this often provides a good time window for the rising. It also gives the bacteria more time to develop, and thus a more complex, nutty flavour.

Yeast reproduce by budding. A small node develops on the yeast cell, becomes bigger until it finally separates, leaving 2 cells. In the picture below (left) you can see the two yeast cells on the left budding, the one at the bottom has just separated. The picture on the right shows lactobacillus bacteria in their colony.

Yeast reproducing Lactobacillus

Here’s a video of yeast reproducing.

We can use this information to effectively control our sourdough times, and taste. For example if we want to have a faster rise it can go on top of the fridge, or in a slightly warmed oven. If we want it to take longer, – if we want our bread to rise while we’re away at work for about 9 -12 hours might be an idea to put it in the coolest spot in the basement, or the fridge.

The taste can be manipulated too: The more lactic acid bacteria (LAB) there is, the tangier it is. LABs tend to develop more slowly than yeast. Thus, leaving it longer will encourage the lactobaccili bacteria and give a tangier loaf.

The starter

The starter is the most important key to great sourdough. Its the home to numerous micro organisms including the yeast. Its responsible for both the rising and the taste. Through its care, you can manipulate it to achieve different results.

mixing the starter refresh

mixing the starter refresh

Every starter is going to naturally mutate with time, and acquire its own special characteristics. Initially its important to see how long your refreshed starter takes to fully bloom. Put a piece of vertical tape on your jar and note the time and temperature of its rise. This will give you vital information about your starter characteristics. In my case, its 8 hours at 22C. What that means is that when I put a new loaf together, AND decide to do it all at room temperature, it needs to do its bulk rise and proofing all well within that 8 hour window. This will assure me of a successful loaf with great oven spring. It also means that I can likely retard the rising to 9-12 hours by keeping the bulk rise conditions at a lower temperature – say 10-15C. On the other hand, the rise will be a lot faster on a humid day in summer.

Taking care of your starter

Keep your starter in the fridge – especially if you want sourdough to be reliable and easy to maintain. At this temperature, it remains not quite dormant yet ready for use. If you keep your starter at room temperature it’s going to be very active until it starts dying off and you will be spending a lot of energy refreshing it. It can remain viable in your fridge for over a month. With time, you will develop your own way to best manage your starter.

I like to keep approximately 300g of starter between bakes. I refresh this with 300g of water and 180g flour. (780g total). I’ll use 400g of starter to make a bulk rise for approximately 3 loaves. To see how this method works, see my Making Sourdough Easy and just in time blog.

The whole rising cycle

This great diagram (below) from http://www.classofoods.com/page1_3.html shows the evolution of the yeast and bacteria in the bread. (You may need to click on the image to see it clearly.)

yeast cycle

The lag phase is seen initially in the bulk rise: you look at it and nothing appears to have happened. There is however a lot happening: Water has activated the enzymes in the flour that convert the starches in the flour to sugars.

In the exponential growth phase it expands. The yeast is now actively eating the sugar, reproducing, and emitting carbon dioxide. It should be proofed and baked in this period.

When it reaches its stationary phase or beyond, the sugar has been metabolized and the yeast cells are going dormant.

What does this mean?

  • When you refresh, you want to have the maximum amount of yeast cells available so its best to let the refresh period run until the plateau phase when there will be the maximum number of vigorous yeast cells.
  • When you bake, the bread needs to be in the oven well before it has completed its exponential growth phase. This enables the final part of the exponential growth phase to occur in the oven.
  • Every time you add flour and water to a starter or even an existing dough you are beginning this yeast cycle all over.

Baker’s percentage and Hydration

There are two very important terms to know about in bread making: Baker’s percentage and Hydration.

Baker’s percentage: Usually percentages add up to 100 – except for bread. The weight of the flour you use is always 100%. All of the other ingredients are expressed as a percent of the weight of the flour. Thus if you have a loaf that has 1000 grams of flour and you add 20 grams of salt, the baker’s % would be 2%. Every single ingredient in your bread can be expressed as a Baker’s Percentage. If this 1000g loaf had 20g salt, 600g water, and 50g starter, the Baker’s Percent for the whole loaf would be 167% (100+60+2+5).

Hydration hydration is the wetness of the dough, the ratio of the flour to the water expressed as a percentage. It’s the weight of the water divided by the weight of the flour. If you’ve got a 1000g loaf (100%) and you add 600 grams of water (600/1000) = 60% hydration. In the starter, 250g water/150g flour gives a 166% hydration.

Final bread hydration is usually anywhere between 60% to 85%. 85% gives you a very wet dough, but one in which the yeasts will appreciate the extra water medium. Even 1% makes difference in hydration. My personal go-to ideal hydration for an everyday pan loaf is 66%, or 66g of liquid for each 100g of flour.

Using a Hydration table

The key to moving on from the fixed set of weights and ingredients to scaling up or down your production, or creating different kinds of breads will be facilitated by using this hydration table.

This hydration table/worksheet has a variety of tabs along the bottom that correspond to the type of baked good you want to make. Its simple to use: you can only change the yellow cells. Changing these will change the formulas telling you how much flour, water and salt to add. All the other cells are locked, so you can’t destroy it accidentally. Until you get used to it, I suggest changing only the amount of starter, as this will scale your recipe up or down. After you are more used to it, you can play with the hydration and ratio of starter to flour.

In addition to the basic dough, there is a sheet for sourdough pancakes and sourdough crackers. Each of these 1st 3 sheets is formatted to work well on a cell phone display.

If this is a tool you find useful, you will probably want to download it as an Excel file, or make your own google sheet copy. Downloading to Excel will remove all the cell protection.

Equipment

Beyond some basic kitchen gear such as mixing bowls, spoons, jars, oven mitts and of course a stove, here’s the other gear you need.

Must have’s

  • A scale: good electronic scales are widely available at hardware and kitchen stores. Make sure it can take up to 5kg. Once you start using it you will come to appreciate the consistency it gives you in your cooking.
  • A good bread pan: thick, no rust. Have at least one that is the size of a pan loaf you want to make.
  • 1L glass jar – preferably wide mouth. This is for the starter beast in your fridge.
  • Pastry brush: to oil the pan, spread toppings or egg white before baking
  • Electronic kitchen thermometer: Until you get completely used to your oven/bread/timings, you need to be sure the baked bread is at least at 190F/88C when it comes out of the oven.
  • Parchment paper: use it to line baking pans, to put under pitas, pizza, batards, boules or baguettes. It makes their transfer in and out of the oven really easy. It also saves you on the cleanup.
  • If you are making boule or batard styles, you should invest in bannetons, a pizza peel, and a pizza stone, though a cooking tray can work in place of a pizza stone and peel.

Good to have

  • Pizza stone: It means that the bottom of your pita/pizza/boule/batard hits a very hot surface when it goes in the oven ensuring more even cooking and a great crust on the bottom. The pizza stone must go in before you turn the oven on.
  • Pizza peel: to move things on and off the pizza stone easily
  • Bread scraper: to help with stretch and fold, clean your surface, help your bread out of the pan
  • Water spritzer: Spritzing the loaf after its been in the oven a few minutes helps the crust get nice and crunchy.

Optional

  • Baguette couches to rise and bake baguettes
  • Other bake pan sizes
  • rising bins: These are large plastic bins many pro bakers use for bulk rising a lot of dough.
  • a lame – an old fashioned razor blade to slash the bread. Sharp knives, especially serrated knives, work well too.

Other foodstuff to consider:

While you can make a very simple bread with only flour, salt, water and starter, you inevitably will want to consider other additions:

  • oil to brush on the pans
  • egg white to brush on top
  • wheat germ, any kind of grain, small seed, sunflower seeds either mixed into the dough during your stretch and fold or as part of the crust
  • herbs/spices/garlic/cheese (as in making a herbed foccacia for dinner)

Doing it!

This section goes into the recipe in some more detail than the straight-up recipe at the beginning of this article.

Refresh

  1. Refresh the starter you need for your loaves: the amounts of water flour and original starter are built into the hydration table. Do this 6-8 hours ahead of mixing. This will assure you of a well refreshed starter. Always make more starter than needed for your loaf – for your next bake.
  2. Plan out what bread(s) you want to make using the hydration table. The same dough can be used to make several different products.
  3. If your starter is highly active and you want more of a sourdough tang, use more starter – as little as a 3:1 ratio to the flour. If it is a little older, you may want to use less – up to 20:1. Doing this will delay the proofing time.

The Bulk Rise

  1. Thoroughly combine and mix flour, water and starter together.
  2. Wait 20 minutes. This wait period is called the autolyse (when the enzymes are converting starches to sugar). The flour is hydrated, fermentation begins, the proteins stretch out, the gluten has a chance to begin its development in the absence of salt.
  3. Add in the salt: 2% of the weight of the flour. The salt is critical to toughen up the dough and slow down the fermentation.
  4. Knead until well combined, put in a bowl with a wet cloth, noting the temperature you are rising it in.
    place back in bowl
    The beginning of the bulk rise
  5. Let it rise: Place a damp towel over it in your mixing bowl and either leave it on the counter for 4-6 hours OR keep it in the fridge for between 12-36 hours.Initially you’ll need to explore parts of your own environment to identify the micro temperature variations that will be right for you. When you gently press it it should indent, not collapse, and slowly spring back. You can stretch and fold the dough once or twice in this period. This removes gasses from the dough, allows the yeasts and bacteria to become acquainted with other parts of the colony (and maybe more food) and helps the dough rise evenly. This process is optional.
  6. Ideally it should be in the middle of its ‘exponential growth’ phase. The dough cannot have finished its full rising at this point, otherwise it will be overproofed by the time it hits the oven.

Shaping the dough and proofing

  1. Remove it from the bowl and knead using the stretch and fold technique.
    Pull
    stretch one corner of the dough…

    and fold back to centre….If your dough has been refrigerated, it will not stretch and fold easily. In this case, just knead it out. The result will be the same: you are working to knock the CO2 out of the dough, and strengthen the gluten.
  2. Let it rest while you prepare your pan(s) (assuming you are making a couple or more bread products).
  3. If you are making more than one loaf, divide it into however many loaves/pitas/buns etc. then begin a second stretch and fold with each one that culminates in them being in their final shape. Use your scale: loaves and boules are typically 800-1000g, baguettes: 400g, buns and pitas: 100g or so.
  4. Shape your final loaves. Youtube is a great resource for observing specific techniques for specific kinds of breads: Loaf pan, boules and batards, baguettes
  5. You more than likely will want to include crust toppings. Here are some ideas:
    • Brush on oil if you are using a pan.
    • A variety of grains, nuts, and seeds always go well. They also form an important layer between the bread and the pan to prevent it all sticking.
    • Adding garlic, herbs and cheese into a baguette gives an excellent dinner side
    • Corn flour or regular flour as a dusting on the top or bottom works well
    • White egg wash will glisten up the top
    • Oil or melted butter brushed on the top browns it nicely too.
      sesame buns on parchment paper
      sesame buns on parchment paper
  6. Slashing is critical: a thin cut on the crust allows the bread to expand well in the oven (oven spring). See either Youtube or this Food 52 entry.
  7. Use parchment paper for anything going on a pizza stone. It makes it so much easier!
  8. Once you have prepared your loaf, you have two options:
    1. put your loaf in the fridge, and put it directly into the oven from the fridge
    2. Let the bread(s) proof for about an hour, until it has begun to rise and will slowly spring back after being gently poked.

Baking

Bake your loaves using these general guidelines. Finished bread should be between 190 and 205 F. Typical bake times:

  • A batard or boule in a banneton @ 800g: 440F/225C for 26-30 minutes
  • for an 800g loaf – 450F/232C for 12 minutes, 425F/218C for 12 minutes, 400F/204C for 12 minutes
  • For a pan loaf cooked directly from the fridge: 450 for 15 minutes, 425 for 14 minutes, 400 for 13 minutes.
  • Pitas take about 3-4 minutes at 450F/232C, preferably on a baking stone
  • Baguettes and buns take between 12-20 minutes at 450F/232C: the bigger the loaf, the more the time.
  • Due to the fact that your oven drops 30 degrees every time you open the door, I prefer to cook my different kinds of loaves separately, though I sometimes will throw in a baguette when a pan loaf is 1/3 cooked.

Disclaimer: This works for my oven which won’t necessarily be true for yours. Your final loaf should be between 190F-205F when finished.

When the bread is baked, remove from the oven and their pans. Check the internal temperature. It should be between 180-190F as soon as it comes out of the oven. Allow them to cool for at least 30 minutes.

Fitting sourdough into your busy life

Integrating sourdough into a busy working life is perhaps the biggest barrier to starting it in the first place. Initially it might seem too complex, concern about timing not fitting in well with your wake/sleep/go to work schedule. I’d argue that this can be easily worked around. Your biggest asset to making it succeed is your fridge. Because your fridge severely slows down fermentation, it gives you a lot of latitude in planning your breads.

For example, you could as follows:

  • Refresh your starter after you finish cleaning up your kitchen after dinner.
  • The next morning you put a bulk rise together before heading off to work, and slide it into the fridge.
  • When you get home, and are preparing dinner, the first thing you do is to take out the bulk rise, shape it into a loaf, and let it proof in the warmest part of your kitchen for an hour or longer if possible.
  • About 45 minutes before dinner is ready, make sure the oven is near 440F and your oven racks/pizza stone are in place for the bread. It may mean you need to sort out other oven usage. Even if you have something already in there at 400F, your bread will still bake – it will just take longer.
  • Bread goes in 25-30 minutes (at 440F) and is ready to eat 10 minutes after coming out.

Bulk rise for all occasions

Its also a good idea to anticipate how much bread your family is likely to eat on an ongoing basis. Using the hydration calculator, develop proportions that will provide enough refrigerated bulk rise dough for about 4 days. This means you can always have a base dough in the fridge. It can be used to make bread, pizza, pita, baguettes – whatever is required. You can decide what kind of loaf you want with a 2 hour time frame.

My suggestion is to also have a loaf prepared to go into the oven already in the fridge. This way, whenever you decide you need a loaf, turn on the oven, and pull it out. The dough does not have to be at room temperature before it goes in the oven.

  • When beginning it, do your initial tries when you are not going to work. Use the hydration table log to record your changes and observations, and to get a feel for it.
  • Identify some of the following:
    • What time of day do you want it to appear out of the oven? (set this as your goal)
    • When are you not around in your house?
    • When is your usual sleep/wake cycle?
  • Keep in mind:
    • Initial mixing takes about 15 minutes over a half hour period.
    • You do not have to be around for the bulk rise
    • The final proofing will take between 1-3 hours from beginning to the end of baking, of which you will be actively attending to the bread for between 10-30 minutes depending on how much you are baking.
    • Consider baking directly from the fridge. In this case the loaf has proofed for 12-24 hours in the fridge and goes directly into the oven. This will cut down on your ‘need to be around while the bread proofs’ time. If you bake it directly from the fridge, plan one hour from “I’m going to turn on the oven” to “OMG this is delicious!”
    • Think creatively of various places in your house that are either warmer or cooler, ranging from a warmed oven (heat to its lowest temperature, then turn it off) to your fridge. Even within your fridge there will be cooler and warmer areas. Basement floors can be really useful if you are in a house.
    • If you completely blow it and either under or overproof it, and you know it, pitas or pizzas are incredibly forgiving, and you will still be more than appreciated for the result.
  • Make a plan that takes into account the needs of the bread and your own time needs and commitments. Try it out, reflect – talk about it with other bakers either near you or on the forums noted below – you will find a solution!

Resources

I’d like to point out some really important resources: This blog and the workshop I am giving are but door openings into the magical wonderful world of sourdough. There is so much more to know, and to experiment with.

  1. The Fresh Loaf is a really thorough and comprehensive site with its own very interactive discussion forum wrapped into it.
  2. Northwest sourdough is the work of Theresa Greenaway, a West Coast sourdough expert baker and teacher. The work I am presenting to you is directly derivative of her work. In her 4 volumes on sourdough she authoritatively covers all the possible uses from breads to quickbreads and cakes. I would strongly recommend getting all four of her books.
  3. Related to this is the https://www.facebook.com/groups/perfectsourdough/ which has a faithful following of both expert and newbie bakers.
  4. And another facebook sourdough group: https://www.facebook.com/groups/360136781918/
  5. Wild Yeast is another baking blog focused on sourdough
  6. The Tartine Loaf is legend on the west coast and this you tube shows you how. This loaf was the focus of Michael Pollen’s AIR chapter in Cooked, also an excellent read.
  7. Bread science is expertly covered by Emily Beuhler in her book of the same name.
  8. Check out the Lactic Acid in Sourdough article for a technical but easy to read explanation of the chemistry of it all.
  9. The Clever Carrot is a blog of similar scope to this one – well described.

Shortbread

Its Christmas baking season! Time to make some more shortbread!

homecookexplorer

A little background on this

Full disclosure. I’m Scottish, and grew up there for most of my childhood. Consequently there are some foods that are part of who I am, even if I only eat them a couple of times a year. Shortbread is one of them. One of my favorite taste memories is dipping fresh shortbread into custard and letting it all melt slowly in my mouth.

But I’m not talking of your usual christmas shortbread cookies all bejewelled in frosting and seasonal decorations, sweet and buttery beyond imagination, and almost crumbly to the touch.

No. The shortbread I grew up with is almost peasant like. Hard, but breakable, it will melt in your mouth, gently releasing its essential yet understated buttery bomb.

Until a few years ago, I had not been successful at copying what I remember of my grandmother and father’s magical creations. Too hard, not the…

View original post 1,000 more words

Shortbread

A little background on this

Full disclosure. I’m Scottish, and grew up there for most of my childhood. Consequently there are some foods that are part of who I am, even if I only eat them a couple of times a year. Shortbread is one of them. One of my favorite taste memories is dipping fresh shortbread into custard and letting it all melt slowly in my mouth.

But I’m not talking of your usual christmas shortbread cookies all bejewelled in frosting and seasonal decorations, sweet and buttery beyond imagination, and almost crumbly to the touch.

No. The shortbread I grew up with is almost peasant like. Hard, but breakable, it will melt in your mouth, gently releasing its essential yet understated buttery bomb.

Until a few years ago, I had not been successful at copying what I remember of my grandmother and father’s magical creations. Too hard, not the right texture – not the right taste. I was told it was all in the kneading. There was too little, too much. Somehow I was not nailing it.

The investigation

A decade ago when I visited my parents, I was shown a slim and decaying cookbook: Reliable Cookery by Mrs. Lawrie (I kid you not. We shall never know Mrs. Lawrie’s first name!) This cookbook according to my dad, was published in the early 1900’s and functioned as a home economic textbook for ALL Scottish girls. (Think of the implications: it defines Scottish cuisine of that generation.) It was extremely practical,providing essential kitchen directions for future scullery maids and housewives, and simple recipes intended to provide an essential baseline of cooking expertise. I’ve uploaded and am sharing it here. I wonder what she would have thought of her modest book being shared in this way.

A little after this, I purchased Michael Ruhlman’s Twenty – an amazing book that shows how far we have all come in both embracing tried and true classical culinary techniques with a bold and new imagination. Along with Ratio, it is an essential cookbook by one of America’s most influential culinary teachers.

I then set about to figure out the definitive shortbread recipe. My usual M.O. when I set out to figure out a recipe is to research. I usually start with the print resources I have at hand. In this case I decided to look at the pdf printout I had made of Reliable Cookery and my two versions of the Joy of Cooking- 1949 and 1997.

The JOC versions seemed to me to be fairly typical butter cookies: 100% wheat flour, and also baking soda and vanilla (1949 edition). The 1997 version was more back to basics, with butter, flour, and sugar. Cream the butter and sugar, add in flour, roll out, cut, bake. Reliable Cookery differed in one important element, one I remembered from childhood: it included rice flour. (Strange, isn’t it. Rice is not a Scottish staple. Why would there be rice flour? And no explanation either.) In this recipe, the dry ingredients (including the sugar) are mixed, the butter is creamed, then they are combined, kneaded, rolled out and cut.

I decided to go with this latter recipe as I reasoned it would be the closest to what my Gran had made eons ago. Here it is. The ratio is something to take note of: 1 part each sugar and rice flour, 2 parts butter, 4 parts flour.

6oz. flour (188g)

2oz rice flour (62g)

4 oz butter (125g)

2oz sugar (62g)

Pinch of salt

  1. Mix dry ingredients
  2. Add butter and work in
  3. Roll out
  4. Bake in a ‘moderate’ oven for 1 hour.

Here is how it appears in the book.

With these quantities and process, it did not ‘roll out’ – it was rather a ‘press into the pan’ job. No surprise. After all there is no water to get the gluten going – indeed there are gluten inhibitors. I took the moderate oven to mean 325-375F. In initial experiments I used 375F (175C) following the JOC and watched it carefully but ultimately I prefer 350F.

As it was cooking, I decided to thumb through Ruhlman’s Twenty – looking for new ideas and new things to try. Lo and behold, there it was, his take on Scottish Shortbread. This was definitely interesting- especially as he noted it was a recipe that had come down through the family of a Scottish friend. No doubt a shared ancestry leading back to Mrs. Lawrie’s tome. http://ruhlman.com/2010/03/scottish-shortbread/

http://lethallydelicious.blogspot.ca/2010/06/scottish-shortbread.html

This recipe has a considerably higher ratio of sugar and butter, and uses a lower gluten cake flour. I appreciated the explanation about the gluten: that the unique crumb is achieved through lower gluten. His solution is the cake flour. Mrs. Lawrie’s was to cut in the rice flour.

My final go-to shortbread recipe

There was however a missing element in all of these recipes. The problem with shortbread is how to keep it firm, and not crumble away. You also want it to easily break apart in neat rectangles, approximately ¾” (2cm) in height. The fork pricks are important to release water vapour. The thickness too is important for the integrity of the biscuit. The key is the thorough and even compacting of the dough. If it is at all loose, it will crumble. Here is the solution, and my current recipe, somewhat modified from Mrs. Lawrie but with metric weights and a lot more specificity that should assure success:

Ingredients

180g flour
60g rice flour
125g unsalted butter
65g sugar

Equipment

  • Mixing bowl
  • Weigh scale
  • Parchment paper
  • Empty 500ml salsa or round mason jar
  • 6”x8”/15x20cm (@ 50”2 /125cm2 ) baking dish for this recipe amount. This will yield shortbread that is an ideal thickness – about ¾” (2cm) thick.
  • Knife and/or pizza wheel

Instructions

  1. Let butter soften to room temperature
  2. Heat Oven to 350F/175C
  3. Weigh out and mix dry ingredients
  4. Add room temperature butter and knead until the dough is fully integrated
  5. Loosely press parchment paper into the baking dish
  6. Press shortbread dough into all corners of the pan – compact it as much as possible
  7. Lay another sheet of parchment paper on top of the dough and find a round jar that can fit into your pan (i.e. a 500ml mason jar or salsa jar) to use as a mini rolling pin.
  8. Roll out and compress the shortbread until it is even. You will also need to press in dough that creeps up the sides with your fingers.
  9. Using a knife or pizza wheel, cut it into desired sized pieces then poke holes with a fork all over. You can also sprinkle sugar on top.
  10. Bake 35-40 minutes. It should be a little brown on the edges. As soon as you begin to smell it, it’s probably ready.
  11. Allow to thoroughly cool before gently removing the parchment paper with shortbread from the pan. It will break cleaner if it is chilled.

Biscotti

Anytime is a great time for biscotti, but I’m doing this in December, and so it’s part of my holiday baking. Biscotti recipes are easy to come by, and so my purpose in presenting yet one more is to get across a couple of important and cool cooking ideas:

  • Setting up a recipe
  • Using a potato (yes, truly)

Setting up a recipe

People who know me know that I have kept an ever growing spreadsheet of recipes for over a decade now. Essentially there’s a number of tabs – like baking, dessert, vegetable mains etc. and within each tab, each recipe has its own column. This is really useful as most online recipes are all in a column format and if I want to send someone a recipe, its copy and paste ‘text only’. You can also easily expand or contract the column so it fits conveniently into your cell phone window. I’ve noted to my son that since just about everything he has eaten at home is on this sheet, it is in a way his culinary DNA.

Also those who know and follow me know that I always use weight measurements. The first thing I do with someone else’s recipe is to weigh each ingredient and slot that into my sheet.

Ingredients

In the case of the biscotti, there are 4 separate ingredient preparations, and they must be added in order. The original recipe here is from Healthy Home Recipes. Its here: Cranberry Almond Chocolate Biscotti. The ingredient list is ordered in no particular way – left up to the cook to sort it all out.

I prefer to see it carefully ordered by clustering similar ingredients together and ordering them in the order they are used in the recipe. In this recipe, there are four sets of additions: eggs & vanilla, butter, dry ingredients, and flavoring mix. What follows are my version of the ingredient list, followed by the original. In my spreadsheet, the groups of ingredients are colour coded as well.

3 large eggs
2 teaspoons vanilla 4 g
1/4 cup unsalted butter, melted 50g
2 1/2 cups flour 220g
3/4 cup granulated sugar 120 g
13g baking soda
1/8 teaspoon salt 2g
1-1.5 cups of whatever flavorings you want: cranberries, currants, slivered almonds, chocloate nibs. This can go as high as 2 cups, but at the risk of the dough not fully covering it all and them breaking apart easily.

Here’s how the original ingredient list is laid out. Note the apparent randomness:

1 1/2 cups flour
3/4 cup granulated sugar
1/2 cup cocoa powder
2 teaspoons baking soda
1/8 teaspoon salt
3 large eggs
2 teaspoons vanilla
1/4 cup unsalted butter, melted
1 cup dried cranberries
1 cup sliced almonds
8 ounces white chocolate, finely chopped

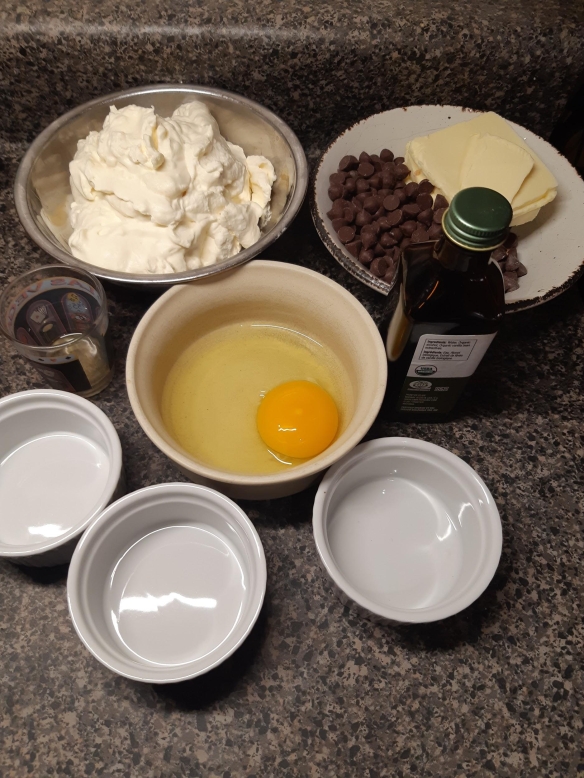
Here is the resulting mise en scene for a double batch:

Instructions

The instructions are not much changed from the original. What’s key is to precisely follow the mixing directions. As this recipe uses baking soda as its rising agent, the resulting batter must be minimally worked and shaped.

Here’s my version of the directions:

  1. Preheat oven to 350°F. Line a baking sheet with parchment paper.
  2. In a stand mixer bowl, hand whisk together 3 eggs and vanilla.
  3. Melt 50g butter.
  4. Sift together flour, sugar, cocoa, baking soda, and salt.
  5. Prepare the 1.25 – 1.5 cups of nuts/fruit chocolate you want.
  6. Put the mixer bowl on the mixer and turn to MIX or stir. Add the melted butter then the dry ingredients and finally the nuts/fruit mix. Mix only until well combined. If you don’t have a stand mixer it really is not the end of the world for this recipe. It can all be done by hand.
  7. Turn the dough out onto parchment paper on a baking tray. Shape the log so that when cut diagonally it will yield biscotti of the shape profile you want. Use a potato cut in half for this. Keep in mind the log will double its width in cooking.
  8. Bake 25 minutes or until firm and dry to touch. Remove from oven.
  9. Reduce oven to 325°F.
  10. Transfer baked log to a cutting board. and let cool for about 10 minutes. Using a serrated knife, cut the log diagonally into 1/2-inch-thick slices (or however thick you want your biscotti).
  11. Place slices on their base so that both sides are open to the air, on the baking sheet.
  12. Bake about 15 minutes or until dry and dark.
  13. Transfer to racks to cool.
  14. If you want them to be chocolate dipped: Melt the chocolate (white or real chocolate) in the microwave or over a double boiler. Dip each biscotti into the chocolate, at an angle, coating the end. Return to a cooled baking sheet and chill about 20 minutes or until chocolate is set.

Original instructions

Here is the original recipe text: Beyond the obvious change to using a numbered list, I’ve also prepared the ingredients in the order they appear in the recipe.
Preheat oven to 350°F. Line a baking sheet with parchment paper or a Silpat liner. In a large bowl, sift together flour, sugar, cocoa, baking soda, and salt. In a separate bowl, whisk together eggs and vanilla. With an electric mixer, beat the eggs and melted butter into the dry ingredients. Stir in the cranberries and almonds. Turn the dough out onto a floured surface. Flour your hands so that the dough won’t stick to them, and divide the dough into 3 equal 8x2x3/4-inch logs. Place one log on the baking sheet and bake 24 minutes or until firm and dry to touch. Remove from oven. Reduce oven to 325°F. Transfer baked log to a cutting board. Using a serrated knife, cut the log diagonally into 1/2-inch-thick slices. Place slices, cut side down, on the baking sheet. Bake about 10 minutes or until dry and dark. Transfer to racks; cool. Repeat with the other two logs. Melt the white chocolate in the microwave or over a double boiler. Dip each biscotti into the chocolate, at an angle, coating the end. Return to a cooled baking sheet and chill about 20 minutes or until chocolate is set.

The potato??

This idea was presented on Food 52’s Chocolate Crocante recipe. This looks like a pretty amazing confection that is harder than it seems. The big idea here is that the potato’s moisture and starch provide excellent lubrication for sticky sweet bakes that would easily frustrate a spatula. Just cut the potato in half and use it to shape your log.

Finally, the pictures here show a double recipe. In one case I added currants and the almond sugar mix from my failed crocante recipe. In the other I went with semi sweet Camino chocolate nibs and dried cranberries, with a sprinkle of cocoa on top.

Final thoughts

When you first see a recipe that you know you want to make, I’m guessing the first thing you do is find the ingredients and assemble them all together. Does the order and how you set them up make a difference to you? Is there not some peace and satisfaction that comes with not only having all the ingredients, but having them set up in such a way that your procedure is logical and consecutive? Whenever I see a recipe where the ingredients are not clearly laid out and sorted, I make changes to it. I could also operate with an unordered layout – but prefer not to. Mis en scene: French for ‘put in place’ is a critical part of cooking preparation. It helps to ensure you do your recipe properly, and helps the cleanup too. Just as the physical layout helps my culinary piece of mind, I like it reflected on paper (or my cell phone) as well.

Perhaps this is a reason I pop all my recipes onto my spreadsheet. If they are worth doing, they are worth doing well, and worth repeating. Being able to retrieve them easily, and having them make immediate sense in its own way promotes great kitchen karma.

Homage to Mollie Katzen

Homage to Mollie Katzen

I’m fine doing a recipe, even creating and adjusting one. Where I fall down is that initial spark of creativity to figure out what to do in the first place. Unlike what seems to be the norm these days, I don’t head over to Pinterest and dial up some assortment of interesting recipes to browse through. Boringly I start by looking in the fridge seeing what is there, and figuring out something that can be made reasonably quickly.

My wife has other ideas. Not exactly heading to Pinterest – but pulling 30 year old fav cookbooks off the shelf she hasn’t looked at for a long time. It was essentially a message to me: “I’m getting a little tired with the same same. You need to broaden things a bit.” My reaction was “Sure, tell me what you would like.”

Three of the books were by Mollie Katzen: The Moosewood Cookbook, The Enchanted Broccoli Forest and Still life with Menu.

Mollie Katzen first came to prominence in the 1970’s with the famous Moosewood Cookbook – one of the best selling cookbooks of all time. It’s a vegetarian classic with pretty much any go to vegetarian dish that is out there. My humus and babaganouj recipes are right out of it. Back in my vegetarian days, her books were a constant go to reference.

Its interesting looking at the recipes now – 30-40 years later. So much has changed: all recipes show volumes – no weights. There’s a lot of cheese happening, and there is no mention at all of fermentation. These books were developed before the internet too. Moosewood is hand written and hand drawn. Over the years, our well used copies are getting very dog eared, with notes and stickies everywhere.

If you do not already have these two books, I would strongly recommend buying them. They are still unique, and still relevant in these faster moving times.

My idea here is to do something of an homage to Mollie and her superb work from a generation ago. Still life with Menu has an interesting concept: instead of a series of recipes categorized by type, a set of menus are presented. Also, she presents options for preparing parts of each meal several days ahead of time – the idea being that you are not scurrying about on the day the meal is served. Finally, each menu is accompanied by a watercolour showing some or all of the menu as a classic still life painting. So my project here will be to try out a number of these menus, and recording my thoughts in this blog.

Light tomato soup, Jewelled Rice Salad, and Yogurt scones

I didn’t have to prepare this one several days apart. It was pretty easy to pull together and I did take some short cuts. I’ll present the original recipe on one side and my variation and notes on the other: Generally I am cutting the recipe in half as there are but three of us eating.

Original ingredients: Light tomato soup My variation
3 lbs ripe tomatoes in chunks 750 ml of my home made tomato sauce
4 cloves garlic, chopped 2 heaping tablespoons of homemade pesto
6-8 fresh basil leaves
2 tbs brown sugar 1 tbs brown sugar
1 tsp salt ½ tsp salt
Pepper to taste Pepper to taste
Parsely and/or dill as garnish. Parsely and/or dill as garnish.

Next up: Yogurt scones

These are, as promised, very light and airy scones. They are more like baked pancakes than anything else. This makes them quite tempting – they were definitely all consumed. As with other recipes I made a half batch, and converted volumes to weights. The instructions are as expected: mix wet, mix dry, & combine stirring as little as possible, bake – 400 12-15 minutes.

I made one addition to it: I added some sourdough starter, and left it all on the counter for about an hour.

Original Yogurt scones My version (approximately half the recipe)
1.5c white flour 110g all purpose flour
1.5c whole wheat flour 70g whole wheat flour
2 tsp baking powder 1 tsp baking powder
2 tsp baking soda 1 tsp baking soda
½ tsp salt 3.6g sal. This is 2% of the flour weight and a much higher % than in the original.
6 tbs cold butter (unsalted) – interesting – back in the day salted/unsalted was not distinguished 45g unsalted butter
2 tbs packed brown sugar 13g brown sugar (when you weigh it, you do not have to be concerned with it being packed or not)
½ c packed raisins 35g currants
1 ¼ c yogurt .75c yogurt
2 eggs (1 egg in mix, 1 beaten and brushed on top) 1 egg + egg white to brush on top
I also added 2 tbs of sourdough starter

After an hour on the counter the sourdough was beginning to work its magic.

I think you will be able to read the original instructions in the photo below.

This recipe worked out quite well, and really was exceptionally easy. As usual I could not help weighing things. The scones turned out a little like pancakes as well – hardly a surprise as they are a batter dropped onto a cookie tray. One change I would recommend is to use parchment paper. This will guarantee nothing sticks. Was parchment paper a thing 30 years ago? Perhaps not.

Finally, a jewelled rice salad.

This was one recipe I did make some significant changes to. I’ve been making grain salads for years now – they offer almost endless variety with the array of grains to choose from and all of the wonderful stuff you can put into them. But in the ‘80’s they were a new idea, and in my opinion we owe a debt of thanks to MK and her collaborators for bring them to our tables.

That said, we have definitely pushed the envelope by 2018 s you will see when the original and my recipe are compared. We want a bigger bolder taste, and this was achieved with a ponegranate half. As in other recipes I cut the original in half.

Jeweled rice salad (original) My version (half the quantity)

I did not weigh these ingredients.

Rice: 2c rice, 3 c water I had brown rice already cooked, so I used 2 cups of that
⅓ c olive oil ⅓ c olive oil ( felt it needed more oil)
6-8 tbs lemon juice 3-4 tbs lemon juice
1 tsp salt 1/2 tsp salt
1 large clove garlic 1 clove garlic
1 tbs honey 1/2 tbs honey
4-6 scallions cut fine 2 scallions cut fine
½ c finely minced parsley ½ c finely minced parsley. I thought it deserved more parsley
1 c toasted pecans 1 c toasted pecans. Likewise. I did not halve these
Fresh ground pepper to taste Fresh ground pepper to taste
2 c red or green seedless grapes I did not have these. Too bad. I substituted soaked raisins.
1 cup chickpeas ½ cup chickpeas
Toasted pecan halves. Toasted pecan halves.
I thought the whole dish at the end needed some additional strong flavors. I added in addition
⅓ cup chopped granny smith apple
2 tbs pomegranate seeds.

Directions

  1. Cook the rice. MK has some very specific directions for the rice (which I did not follow as I already had some available):
    1. Bring to a boil
    2. Lower heat to lowest simmer for 35 minutes
    3. Transfer to a shallow platter and spread to let steam escape. This prevents it overcooking in its own heat
  2. Combine olive oil, lemon juice, salt, garlic and honey
  3. Add parsley, pecans and pepper.
  4. Mix well in its serving bowl, add garnishes – pecans, scallions, parsley

And there is my first revisit of Still Life with Menu. Both it and Moosewood are still readily available, and I would strongly recommend getting them. They may easily become your go to sources for all that is vegetarian.

I hope you give these recipes a try – and as you can see, they are quite amenable to variation.

Sourdough Bagels

Imagine: Fresh tangy  bagels right out of the oven for breakfast. Ones made by YOU. 

Sounds great?   You can do this and it’s not that hard.

This blog tells you how – and in particular bagels of the sourdough persuasion.

There are a few sites that will teach you about making bagels, but they are usually done by professional bakers, thinking of larger scale production. They also are yeast based.

I’m a home baker, not making any more than between 4-6 at a time. This is important as I am interested in both freshness and efficiencies of both time and ingredients. And sourdough is my baking medium of choice.

This blog is  associated with some of my other blogs on sourdough:

 but bagels are a particular kind of baking process that requires a different treatment.

There is one really excellent instructional video you really ought to view before doing your own – Breadtopia’s bagel video http://breadtopia.com/how-to-make-bagels/ This one is a yeast based recipe, is considerably bigger scale, and with respect to the water in the oven, a tad complex for my liking. But its the one that made the most sense to me when I was developing my own technique.

Sourdough bagels can either take a really long time to pull together, or they can be relatively fast. The relatively fast version means that you already have a bag of dough ready to go in the fridge. The slow version means you begin with a starter, refresh, refresh again, make a bulk dough, THEN put the bagels together. I will describe both, beginning with the fast version.

The Fast Version

To do this version, you need to have at least a .5k or 1lb of sourdough bulk rise dough in the fridge.  Check out my Making sourdough easy and ‘just in time’ blog for the backgrounder on how you can set up a truly efficient sourdough regime. 

The night before  (best done when preparing dinner.)

Time : about 20 minutes

You need

  • Bulk rise dough
  • Weigh scale
  • Parchment paper
  • Plate or baking tray
  • Wet (rinsed wet) cloth
  • cornmeal
  • Dry malt extract or sugar

Instructions

  1. Check your dough’s hydration. You should already know this. Bagels require a 60% hydration. If your dough is different than that you can use my hydration change calculator to make the adjustment. If this is still a tad confusing and you just want to get on with it, bagels need a stiff dough – however you get there. 
  2. Assuming 110g or 1/4lb per bagel, take out the dough needed to make the number of bagels you want.
  3. Also add some sugar. This can be in the form of regular sugar, or dry malt extract. For these small batches I add about a tablespoon or so. The sugar encourages more yeast action in the bagels. Maple syrup or honey can also be used but if you do, you have to treat them as liquid and add flour to keep the hydration at 60%. For our small batch I would suggest 30g honey/maple syrup and 50g flour.  Knead the dough, the sugar and (if needed) extra flour or water until it is a well kneaded ball.
  4. Separate the dough into balls of dough – one per bagel. Weigh them so they are all the same weight. Vigorously knead and roll the dough as you would plasticine to make each dough ball into a long sausage shape. [photo showing the rolling and twisting] 
    Bagels can be anywhere from 100g to 150g

      Bagels can be anywhere from 100g to 150g

    Bagels rolled and twisted in a sausage shape

    Bagels rolled and twisted in a sausage shape

    bagels-6

  5. Twist the sausage shape working to stretch the gluten in the dough as much as possible. Form it into the classic bagel shape crimping the ends together.
  6. Prepare a parchment paper with a thin layer of corn flour, place the bagels on the flour, leaving lots of space between them. Cover with a damp towel and put into the fridge overnight. [photo of bagels ready for the fridge]

    Bagels ready to go in the fridge (with a wet towel of course)

    Bagels ready to go in the fridge (with a wet towel of course)

In the morning…

Time: 40 minutes in all, 10 minutes of active work

You need:

  • Cornmeal
  • Baking soda and sugar
  • Baking stone
  • Widest frying pan you have, but should be at least 2” deep
  • A slotted spoon
  • A tablespoon measure
  • Pizza peel
  • Parchment paper
  • Bagel toppings (egg wash, poppy seed, sesame seed, flax, other grains and nuts….)

bagels-12


Instructions

  1. Make sure you have a baking stone in the oven, more or less in the middle, and enough space below to fit the frying pan with water. Turn the stove on to 480F/250C.
  2. Using the widest frying pan you have, fill it ¾ full of water, add 1 tsp of baking powder, 1 tbs sugar (or if you have it, dry malt extract) and set to boil, lid on. Your timing on these two items depends on how fast your stove and your heating element heat up. Ideally the oven should reach 480F about the time the water is boiling on the stove. What you are trying to avoid is having the bagels ready to go into the oven before it is properly heated. 
  3. Remove the bagels from the fridge and place them next to your frying pan of boiling water. Gently make any final shape adjustments you want (bigger/smaller hole, rounder etc.) 
  4. When the water is at a rolling boil, place the bagels in it. You should be able to place between 4-6 bagels in a 12” skillet. It will initially go off the boil with the fridge cold bagels. Once it comes back to boiling, boil the bagels on one side for 30 seconds at least . Sometimes the bagels stick to the bottom  – if so gently pry them up about 10 or so seconds into this first boil. They should rise to the top once they expand and they must do this before they are turned. It’s important to note that most of their rising occurs in the boiling.  After 30 seconds, flip the bagels with the slotted spoon and continue to boil for another 30 seconds. 20161103_061600
  5. While the boiling is happening, sprinkle more cornmeal on the parchment paper (or you can use new parchment paper if you like) and prepare the toppings and a spoon.
  6. Working quickly, remove the bagels from the pan and place them on the cornmeal parchment paper.
  7. Using a spoon, sprinkle toppings as desired 20161103_061721
  8. Put the frying pan of nearly boiling water in the oven under the baking stone 20161103_061816
  9. Using a pizza peel, slide the parchment paper with the bagels into the oven [photo of bagels ready to go into the oven]
  10. Turn heat down to 450F/233C (it will likely be at that once the water and bagels have  gone in) and bake for 20 minutes. 
  11. Remove and place in a basket – parchment paper and all. 
  12. Enjoy! (and don’t forget to remove the pan from the oven too.)

20161103_064041

So that was the short version: about 20 minutes in the evening and about 45 minutes the next morning. Here’s the longer version for a 6 bagel batch. I use organic whole wheat flour for the starter and a combination of all purpose organic and red fife flour for my dough.

The LONG Version

24 hours ahead (morning)

The timings for these risings are a little shorter than what I would usually do, and the compensation is rising them in a warm location. Alternately you could do the first refresh the night before (2 nights before the bagels are made), plan on about 8 hours per rising, and in a cooler environment of 20C/68F

  1. Refresh 100g of starter with 100g water and 60g flour, and let it develop for 6  hours at a warmish room temperature around 24C/75F (e.g. 6AM-12 PM)
  2. Refresh this starter again with 250g water and 150g flour, letting it develop for 6 hours. (e.g. 12PM-5PM)
  3. Prepare a bulk dough with 120g of this starter, 360g flour, 170g water, and 8g salt.
  4. Let rise for a further 5  hours or so before proceeding to ‘the shorter version’.

The following table shows how you would manage things beginning 36 hours ahead or 24 hours ahead.

Step 20C/68F 24C/75F
  1. First refresh
10 PM (36 hours before) 6AM (24 hrs before)
2. 2nd starter refresh 6 AM (24 hours before) 12PM
3. Bulk dough 2PM 5-6PM
4. Shaping into bagels/refrigerating 8PM 10-11PM
5. Boiling 6AM 6AM

As you can see this is a day long project and a lot of attention to time, detail, and being available all to get only 6 bagels. It’s not even ideal, as it really is best to prepare the bagels around dinner time the night before. To accommodate this you would need to begin your starter refresh in the middle of the night.  That’s why I prefer to do the shorter version  – but you would need to be doing what I note in my “Making sourdough easy and ‘just in time’ “ blog.

More fun with Sourdough: Party Bites

It’s been a while since I last did a blog.  I’ve been pretty busy with an online course I’m teaching.

This blog is about finger foods and neat things you can do with sourdough. It started a couple of days ago with a request. My son attends a program with other adults who have quite complex needs and they’re having a Christmas party. I was asked to supply some of the food and the criteria set for me what was that it needed to be

  • delicious
  • easy to eat finger food: something you can pop in your mouth.
  • soft
  • healthy
20151217_072639

The finished bites. This quantity uses about 700g of flour and about a litre of filling.

So I was wondering what to do. I had an idea of people being able to pop something fairly small into one’s mouth. I thought about using bread dough to surround a filling  – sort of like an oven baked sandwich.  Like Tim Hortons Timbits except healthier. A further criteria  I also added was that I didn’t want it to be greasy: when it was picked up and eaten hands would remain clean.

I figured that if I rolled out a 66% hydration dough (your average bread dough) to about a quarter inch or so, trimmed to an even rectangle, about 12”/30cm x 4”/10cm that would be a good start.

I then brushed on melted butter (you need a fat hit in this kind of thing – but not too much). Next I added about half a teaspoon of  filling, and wrapped it up so the filling is entirely cased in dough.

It went as I had envisaged and I’m very pleased with the results.

The two fillings I used in this particular case were a vegan ricotta analog:  a block of tofu, lemon juice, lemon zest, salt, pepper, and parsley. It’s what I used for my  cheeseless vegan lasagna.  The other filling I made was a mix of diced red pepper and chicken burger from  chicken burgers I made  recently. But really, you can add any filling you want.

20151216_134011

Ingredients for the vegan ricotta analog

This is a food in the same tradition as filled pastries and croissants,  somosas, calzones, ravioli, patties, pasties – even arguably fritters – except that instead of being several bites big, its one  – at the most 2 -bites big. And unlike its culinary siblings, using a bread dough means its clean to the touch and contains a lot less fat, though just enough to make the taste amazing.

Assuming you bake bread, I’ll take the directions from the point where you have a dough that is  bulk risen and ready for its final rise. For the quantities you see in these pictures, I started with about 700g of flour.

  1. Heat oven to 450F
  2. Roll out first rise completed  bread  dough to about ¼” thick and trim it with a pizza cutter to yield rectangular shapes 4” or 10cm wide  20151217_055319
  3. Melt about 20-30g butter
  4. Brush the melted butter on the rectangles
  5. Spoon ½ tsp  blobs of your desired filling  along the length of the rectangular dough leaving a small space between each one  – just like making ravioli. 
  6. Fold the  half of the rectangle with no filling over the filling.
  7. Cut  between the folds with the pizza cutter and begin to crimp and work on the on the ball to make it as smoothly round as possible, with all the filling encased. The more accurate  the better.
  8. Bake on a baking tray with parchment paper or a silpat liner for about 11 minutes at 450F. They should be browned on the bottom and gently puffed out.20151217_062536
  9. A note on the filling: if you are using meat, it can go in raw as you will be baking it to about 200 degrees F. The fat drippings from it will infuse into the cooking dough, making the end result wonderfully comforting and filling.
  10. Don’t be tempted to brush some butter on the top  unless you  want it obviously greasy.  
  11. Cool and serve.

If you like the look of these, I’d be really interested in what you decide to use as a filling. Please jump to the Replies and share your ideas.

Fun stuff to do with sourdough

Fresh herbs and slices of butter leaving room to fold over the dough.

Fresh herbs and slices of butter leaving room to fold over the dough.

A couple of days ago I did my sourdough workshop. It meant I had to prepare a loaf (which was all eaten), a bulk rise, and during the workshop we put together another bulk rise. It meant I had quite a lot of doughy product to sort out after the workshop.
The loaf that had proofed overnight in the fridge after enduring about 3 hours of proofing at room temperature was predictably overproofed. I should not have slashed it. Oh well. Taste was still fine.
What I decided to do with half the dough we put together was to make a BBQ’d herbed tea biscuit (sort of) dinner flatbread.
I took about half the dough (about 400g) which had been refrigerated overnight and had risen slightly & rolled it out on a floured surface until it was about 1/2” thick.
I then went out and cut some fresh oregano, thyme, basil and chives, cut them up and spread them on the dough. Garlic and pepper too.
Next I laid the inside 70% of the surface with generous slices of unsalted butter, and folded the corners and sides over so that no butter was showing.

BBQflatbread (3)

In the middle of folding and rolling. Its important the butter does not squeeze through.

In the middle of folding and rolling. Its important the butter does not squeeze through.

Following the technique used for laminated pastries – puff pastries, croissants and the like, I folded the dough gently in 3, rolled it out gently, being sure to flour it so nothing would stick. I repeated this “fold in 3 then roll out” sequence a number of times – maybe 6-8. Anytime some butter showed up, I slapped a little flour on it.
For the final roll out I left it at approximately ½” or 1.5 cm thick in a somewhat oval shape, on parchment paper, for about an hour.
After an hour, turned on the BBQ, and once hot, I gently turned the dough off the parchment paper and onto the BBQ. I’m afraid the timings here aren’t a fine science: you want to cook it through. This amounts to 2-3 minutes on each side. What happens is the dough cooks, the butter melts and evaporates, infusing into the dough and helping it to rise, as its trapped by the flour layers around it.
It can be served either as a large flatbread, or cut into squares and served as tea biscuits.
What you get is a quite decadent buttery herby dinner flatbread. Yum!

BBQflatbread (1)

image

baguette and pitas about to be baked

The next day…..

But there was another chunk of dough as well, languishing in the fridge. What to do with it? Well I had put on chickpeas to soak – thinking humus and falafel. So what more logical than to do some pita to accompany it. Again I had about 400g of dough to play with. Not enough.
So what I did was to add some more dough – white flour: 400g flour, 240g water, 8g of salt: all ‘baker’s ratio’. I was also a little concerned that the starter would be a little old so I added a pinch – truly no more – of yeast as well. Four hours later and it was nicely risen to become little pitas and a baguette. The dough in the fridge had become a kind of mother dough. Here I wanted something like the choices I get at a sub shop. I added italian herbs, garlic and Asiago cheese on top. For the pitas I wanted fairly thick soft ones that could hold a falafel or other sandwich material.

It all worked out well. The baguette is delish as are the pitas. All this goes to show what kind of flexibility and on the spot creativity you can get with a chunk of old sourdough bulk rise.